
The Fujifilm Instax Mini is one of the most fun and engaging gadgets on the market. Everyone from professional and hobbyist photographers to children and teens love this instant Polaroid-type camera. Knowing how to adjust the settings on your Fujifilm Instax Mini 8 or 9 will ensure you get the best photos, every time. Read on to learn which settings you should use in each instance and how the camera’s settings can help you work with lighting to make the most of your Fujifilm Instax film.
Fujifilm Instax Mini Version Comparison
The two most popular versions of the Fujifilm Instax Mini so far are 8 and 9. The Fujifilm Instax Mini 8 is sold in five color options and has all the basic features you’ll find in the Fujifilm Instax Mini 9. The Instax Mini 9 comes in five all new colors and has a couple new features not seen in the 8th version. Both cameras can take instant photos, printable on demand in any environment. These are party favorites and have been showing up at weddings and reunions, as well as birthday parties and other gathering more frequently in recent months.
The Instax Mini 8 has a detachable close-up lens, but the lens is sold separately. The 9th version of the Fujifilm Instax Mini comes packaged with the detachable close-up lens, so if you’re going to buy the lens anyway it makes sense to go for the Instax Mini 9.
Another difference in the Instax Mini 8 and 9 camera versions is that the Instax Mini 9 comes with a small front-facing mirror to help you stay in frame while snapping selfies. This mirror can help you reduce wasted film and center your photos better, as it is angled to accurately reflect the image that will display in your printed photo.
Settings for the Fujifilm Instax Mini 8/9
The Fujifilm Instax Mini 8 settings are identical to those found in the newer model. There are a total of five aperture settings on each camera, which are incredibly useful for allowing you to take photos in a variety of lighting conditions. Once you review the basic principles behind the Instax Mini’s aperture, you’ll never again take an overexposed or underexposed instant photo.
The five aperture settings on the Instax Mini 8 and 9 are designed to allow more or less light into the camera’s lens to create the perfect brightness for each of your pictures. In all camera, aperture refers to the spirally mechanism that opens and shuts to expose the internal lens and sensor to more ambient or direct light from the setting you’re in.
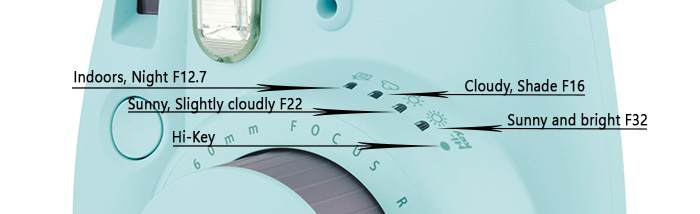
The settings on the Instax Mini 8 and 9 are as follows:
- Sunny – for outdoor photos in daylight
- Partly Sunny – for outdoor photos in dimmer light
- Cloudy – for dimmer outdoors lighting conditions
- Indoors – for dusky outdoors and dimmer indoors shooting
- Hi-Key – for poorly lit indoors settings
These five settings determine how widely the aperture mechanism will open, thus controlling how much extra light will reach your camera’s internal sensor. While outdoors on a sunny day, use a high aperture setting like Sunny or Partly Sunny to minimize the brightness of your pictures and avoid overexposure since there will plenty of ambient light already. In a dim room or while shooting at night, use a low-light setting like Hi Key to open the aperture mechanism wider and allow more light to brighten your photos.
Both recent versions of the Instax Mini are also equipped with a flash device to add light to photos in darker settings. The flash on each camera is automatically engaged when the camera’s sensor detects you’re trying to take a photo in too little light.
Other tips for working for lighting to get the best photos with your Instax Mini include facing away from the sun or any direct light source when snapping your photos, and cleaning the lens with a glass-safe camera lens wipe before each use. With the photographer’s back to the light source, the subjects of the photos are more likely to appear well-lit and you avoid the risk of overexposing your picture. Small debris or dust on your lens can have an large impact on your shots, even creating black spots in your printed photographs.
Fujifilm Instax Mini Problems
By paying careful attention to the settings and lighting conditions, you can correct just about any problem you run into with your Instax Mini camera. Pictures too dark or too light can be a frustrating problem for some Instax Mini owners but there is an easy solution.
There are two main complaints among new owners of an Instax Mini 8 or 9: overexposed and underexposed photos. Overexposure occurs when too much light enters the lens during the shot. If your pictures come out white, then you’re likely overexposing film in your camera to light.
To avoid this issue, shield any new film from light sources before installing it in your camera and choose the correct aperture setting for your photography environment. It may take a few shots to get the hang of how much light constitutes “sunny” or “dim” lighting but with a methodical approach to practice, you’ll soon get the hang of it. Use the images on the camera’s settings for a guide. For example, when shooting outdoors daytime photos use the Sunny mode (as indicated by the sunshine icon on the camera’s lens.)
If your photos are coming out too dark then you’re not letting enough light into the lens while shooting. This issue is known as underexposure. Move to the next higher aperture setting to balance the lighting conditions, and make sure the flash isn’t blocked in line of view from the subject of your photo.
Another issue that Fujifilm Instax Mini 9 and 8 users sometimes encounter is film not developing. There are three likely causes for this; each easily remedied. First you should check that the shutter is opening and closing when the camera is supposed to take a photo. If your shutter isn’t working then you need to check that your batteries are fully charged and installed properly. Don’t mix battery brands or use corroded or expired batteries.
Bad batteries alone are the second cause of film failing to develop, as well. Even if the shutter is moving, consider trying your camera with a different set of batteries to see if it corrects the issue. Lastly, check that the film itself isn’t expired. Expired film will often fail to develop properly in any instant camera.


